Add digital display to hand-crank pointer winding machine
Source: InternetPublisher:笑流年 Keywords: Digital display counter Updated: 2025/03/21
Add digital display to hand-cranked pointer winding machine
The hand-cranked pointer-indicating winding machine is cheap and light, with a simple and reliable structure and is widely used. However, it has a major drawback, that is, the number of turns of the wound coil is indicated by a digital disk driven by a transmission gear. When the indicator dial is worn or stained with dirt over time, there will be errors and it will be difficult to identify, which is a major drawback.
Although there are already finished digital tube display hand-cranked winding machines for sale, it is obviously not cost-effective to discard the old and buy a new one. For this reason, the author has "upgraded" the digital tube display of the pointer-indicating hand-cranked winding machine.
The digital display part uses a finished counter, model M-0156, with a total value of 999999. The counting pulse is detected by a slot-shaped photoelectric switch. The circuit board adopts an epoxy resin double-sided board design, and the workmanship is relatively sophisticated. The measured circuit of the whole machine is shown in Figure 1. The parameters marked in the figure are all measured values, and the component symbols are added by the author.
The following introduces some simple application function output pins of the single-chip microcomputer PIC16C57C on this counter. The M-0156 counter circuit is mainly composed of the single-chip microcomputer PIC16C57C, the seven-segment drive amplifier circuit uP-A2003C, the memory 24L01B, the optical coupler 2501 and the three-terminal regulator 7805.
Working principle: The external AC 220V voltage is stepped down to 12V by transformer T, and then rectified by D1~D4 and filtered by C1 to obtain a DC voltage of about 15V. This voltage is divided into two paths: one path is connected to the external terminal ③ of the counter through the current limiting resistor R4 to provide working voltage for the external photoelectric switch; the other path is outputted by 7805 voltage regulator +5V to power the integrated circuit and digital tube on the main circuit board. During operation, the shielding plate on the winding machine rotates with the main shaft that fixes the coil. Whenever the gap of the shielding plate passes through the notch of the slot-type photoelectric switch, the CE pin of the photoelectric switch is turned on, and the counter pin ② is "short-circuited" to the ground. The photoelectric switch signal is isolated and coupled by the optical coupler U5 (2501) inside the counter, and input to the microcontroller pin (15). After being processed by the microcontroller, the control level is output by the pins (10), (11), (12), (13), (14), and (17), and the bit display of the digital tube is controlled by uPA2003C; the control level is output by the microcontroller pins (16), (19), (20), (21), (22), (23), and (24), and the segment display of the digital tube is controlled. K is the reset switch of the microcontroller.
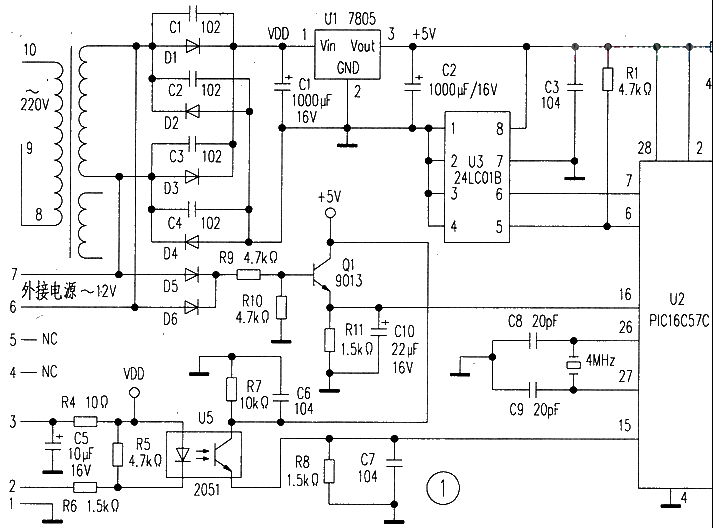
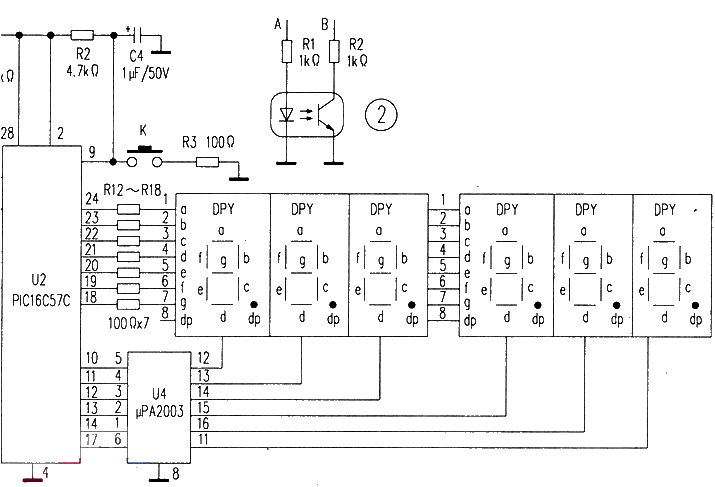
Key points: First, on the back frame of the "speed-changing shaft" of the winding machine, there is a φ40mm round hole on each side. Use an M5 tap to tap, then use an appropriate iron sheet to make a bracket, and fix the counter on the winding machine. The pulse signal of the count is collected using a slot-type photoelectric switch. And make a φ40mm round shielding sheet, and use a universal glue to stick the shielding sheet to the rotating spindle of the winding machine. The opening of the shielding sheet cannot be too small, otherwise it will cause the photoelectric tube to have insufficient reflection time when the winding machine is winding the coil at high speed, resulting in the loss of counting pulses. The internal circuit of the M-0156 counter provides working voltage to the external photoelectric switch through the output terminal ③. Since it is designed for the operation of a variety of photoelectric switches, its internal current limiting resistor is relatively small (only 10Ω). Therefore, when modifying, the external slot-shaped photoelectric switch should be connected to a current limiting resistor (see Figure 2), A connected to terminal ③, B connected to terminal ②, and the other two feet connected to terminal ① (ground). In addition, if the signal line of the photoelectric switch is too long or the contact is poor, interference will occur. Causes the counter to count continuously.
- 23w energy-saving lamp ballast using UBA2025 power IC
- Energy-saving and environmentally friendly solar building ladder lights
- A white light LED power outage emergency light
- IR2153 emergency fluorescent lamp circuit diagram
- Six LED stereo VU display circuit built with IC LM3915
- Blinking LED circuit diagram based on LDR and resistor
- LED Signage with RS232 Port Operation Guide
- "OR" logic element configuration circuit
- Use NE555 to make a touch self-extinguishing table lamp
- Infrared remote control dimmer light circuit
- Digital display timing circuit
- Digital display temperature detection circuit
- Fish tank intermittent oxygenation timer circuit
- Simple long delay timer circuit
- Dynamic digital display circuit based on microcontroller
- High voltage Geiger counter power circuit
- Programmable counter
- Using 4017B as a programmable counter
- Octal ring counter
- Use counter to make timer circuit diagram


 京公网安备 11010802033920号