"Engineering Faith" Shanghai Electric Power LOGO Faith Ruler - Based on LCSC's Official STM32F407 Project.
First of all, I would like to thank LCSC for the official STM32F407 development board open source project
link: https://oshwhub.com/OSHWHubkai-yuan-ying-jian/fBKTh1GeUxmI7vLFqE2uE8QdeCJcgtw5
. LCSC's official design is really simple, durable, and beautiful.
I'm really looking forward to everyone's better appearance design .
I feel that many open source boards nowadays have geometric shapes or silkscreened textures on the front.
that has the logo of some big companies printed on it? It sells for about ten yuan on Taobao.
So, I started designing it myself . Actually, I
encountered postgraduate entrance exams and other things, such as working on papers and writing code, and I had already left hardware work for several years. It took me about two years to work on it on and off.
Because the front of the good-looking faith ruler is a computer motherboard (like the one with the NVIDIA logo), but obviously I don't have that ability, QAQ. So I thought of designing an STM microcontroller system board, which was less work and more relevant to my expertise.
However, a challenge arose: I found that drawing lines at a 30-degree angle was quite unconventional. Generally, EDA software only offers 45°, 90°, and free angle options, and naturally, drawing a natural circuit board at a 30-degree angle is very counterintuitive.
After searching for a long time for open-source projects, I found an official open-source project by a senior developer: https://oshwhub.com/OSHWHubkai-yuan-ying-jian/fBKTh1GeUxmI7vLFqE2uE8QdeCJcgtw5.
I rotated the entire top layer by 30 degrees, transferred all the top-layer traces and pads to the bottom layer, copied them to the solder mask layer, and retained a portion of the silkscreen layer. After copying about five pieces, I pieced together the entire bottom-layer pattern.
Next, I spent about two days modifying the details, such as changing some pads and vias to circular pads on the bottom layer.
There's not much to say about the top-level scale and component packaging; many experts on the platform have already done this.
Since it's purely a circuit appearance design, more like a craft item, there's no need to worry about design principles or connectivity; the appearance just needs to conform to the intuition and aesthetics of PCB design.
Of course, I designed it as a cultural and creative souvenir from Shanghai University of Electric Power, so I included our school's logo.
My advice to everyone making PCB rulers is to draw complex patterns on the silkscreen layer. I originally wanted to put all the patterns on the circuit layer and solder mask layer, but the JLCPCB order reviewers rejected it several times; perhaps these patterns are indeed quite difficult to create. So I used silkscreen for all the patterns and logo.
I made 100 of this size, black with immersion gold, at about 6.5 yuan each. So, it's actually quite reasonable for the lab to share the price. Love you
PDF__Engineering Faith_Shanghai University of Electric Power PCB Faith Ruler—Based on STM32F407.zip
Altium__Engineering Faith_Shanghai University of Electric Power PCB Faith Ruler—Based on STM32F407.zip
PADS__Engineering Faith_Shanghai University of Electric Power PCB Faith Ruler—Based on STM32F407.zip
BOM__Engineering Faith_Shanghai University of Electric Power PCB Faith Ruler—Based on STM32F407.xlsx
This project is based on the ESP32C3 and can be used to store website keys, 2FA, TOTP, and TXT files.
KeyBox-ESP32C3 Electronic Key


This is a C language-based electronic key storage
program source code: https://github.com/JasonYANG170/KeyBox
Shell File: https://makerworld.com/zh/models/656380#profileId-583410
Demo video
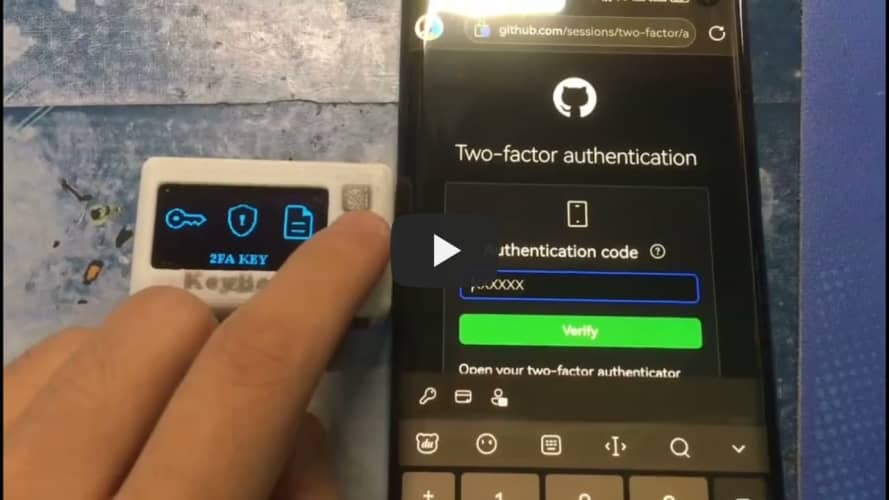
cannot be played, please click here to use BiliBili
Features
✅ Supports importing website keys from browser
✅ Supports TOTP 2FA real-time verification code binding
✅ Supports Bluetooth simulated input HID
✅ Supports WIFI NTP time synchronization
✅ Supports setting 6-digit device password
✅ Supports screen off
✅ Supports screen brightness adjustment. Plans
[ ] Access IoT Internet of Things Client
[ ] Weather, time, news, battery display
Open Source License
This project follows the CC BY-NC-SA 4.0 open source license. When using this program, please indicate the source and make a copyright statement.
This project is for learning and research purposes only. Unauthorized commercial profit is strictly prohibited.
If you have better suggestions, PR is welcome.
If you encounter any problems, please raise issues.
If you like this project, please give me a Star ⭐

Real picture
1
2


System Introduction:
This project is a desktop weather station based on the LCSC ESP32S3R8N8 development board. I have several ESP32 development boards, but I dare say that the LCSC ESP32S3R8N8 is the most aesthetically pleasing and fastest, bar none. This desktop weather station project includes functions such as real-time time acquisition, online weather forecast acquisition, local air pressure, temperature, and humidity acquisition, colored LEDs, and button functions.

PCB Design
Notes: The schematic diagram shows two screen interface designs: a 0.5mm pitch for plug-in connection and a 0.8mm pitch for soldering. The FPC adapter board is for extending the 0.8mm screen.

Software Description
Note: Partial Software Code
Blocks:
// 1. RGBLED Control
#include
// Initialize LED control instance
Adafruit_NeoPixel pixels(4, 11, NEO_GRB + NEO_KHZ800);
int16_t idx = 0; // Current LED pointer
unsigned int bright = 0; // Define brightness variable
// Light up RGBLED task
void TaskRgbLed(void *parameter)
{
while(1)
{
esp_random();
pixels.setPixelColor(0,pixels.Color(random(255),random(255),random(255)));
pixels.setPixelColor(1,pixels.Color(random(255),random(255),random(255)));
pixels.setPixelColor(2,pixels.Color(random(255),random(255),random(255)));
pixels.setPixelColor(3, pixels.Color(random(255), random(255), random(255)));
// bright++;
// bright%=256;
bright=20;
pixels.setBrightness(bright);
delay(1000);//delay, change speed
pixels.show(); // display
}
}
xTaskCreate(
TaskRgbLed,
"TaskRgbLed", // Task name
10000, // Size of the task stack, used to store the context information of the task runtime. Simply put, it can store up to this much information
NULL, /* Parameter passed as input of the task */
1, // Task priority, with 1 (configMAX_PRIORITIES - 1) is the highest, 0 is the lowest.
NULL); /* Task handle. */
// 2、I2C read pressure value
#include "Wire.h"
#define I2C_SDA 15
#define I2C_SCL 16
#define I2C_DEV_ADDR 0x60
float P=0.00; // Pressure
float T=0.00; // Temperature
// Read air pressure value
void getCps121(){
float buff[5]={0}; // Save the original temperature and pressure data: the first three digits are pressure, the last two digits are temperature
uint8_t bytesReceived=0;
Serial.println("Measuring atmospheric pressure and temperature");
// Send test command MR, wake up the device and perform a measurement
Wire.beginTransmission(0x6C);
Wire.write(0x30);
Wire.write(0xA);
Wire.endTransmission(true);
delay(100);
// Send read command, read data
Wire.beginTransmission(0x6C);
Wire.write(0x06);
Wire.endTransmission(true);
bytesReceived=Wire.requestFrom(0x6C,5,true);
if(bytesReceived==5)
{
buff[0] = Wire.read(); // Read the first data, pressure
buff[1] = Wire.read(); // Read the second data, pressure
buff[2] = Wire.read(); // Read the third data, pressure buff[3] = Wire.read(); // Read the fourth data, temperature
buff[4] = Wire.read(); // Read the fifth data, temperature
buff[4] = Wire.read(); // Read the fifth data, temperature buff[5] = Wire.read();
Serial.println(buff[0]);
Serial.println(buff[1])
;
Serial.println(buff[2]); Serial.println
(buff[3]);
x 256 + Pressure1st Byte [7:0]) / 2^6/1000
P = ((buff[0]*65536+buff[1]*256 + buff[2])/64)/1000;
Serial.printf("Pressure= %.2f kPa
",P);
//Positive Temperature [°C] = (Temperature High Byte [15:8] x 256 + Temperature Low Byte [7:0]) / 2^8 Negative Temperature [°C] = (Temperature High Byte [15:8] x 256 + Temperature Low Byte [7:0]-65536) / 2^8
T = (buff[3]*256 + buff[4])/256;
Serial.printf("Temperature= %.2f ℃
",T);
}
}
// 3, Light up the WorkLed task
void TaskWorkLed(void *parameter)
{
while(1)
{
// Set pin 48 to output low level
digitalWrite(48,LOW);
digitalWrite(10,LOW);
//digitalWrite(9,LOW);
// Delay 100ms
delay(500);
// Set pin 48 to output high level
digitalWrite(48,HIGH);
digitalWrite(10,HIGH);
//digitalWrite(9,HIGH);
// Delay 100ms
delay(500);
// The screen refresh is placed in the same thread, otherwise it will crash.
// Refresh time
digitalClockDisplay();
delay(100);
// Refresh weather
drawWeather();
}
//vTaskDelete(NULL);
}
4. Screen part
#include
#include
#include
#include
#include
// Screen pin definition
#define TFT_CS 48
#define TFT_RST 21
#define TFT_DC 40
#define TFT_MOSI 39 // SDA
#define TFT_SCLK 38 // SCL
// Create TFT object
Adafruit_ST7735 tft = Adafruit_ST7735(TFT_CS, TFT_DC, TFT_MOSI, TFT_SCLK, TFT_RST);
// Adafruit_ST7789 tft = Adafruit_ST7789(TFT_CS, TFT_DC, TFT_MOSI, TFT_SCLK, TFT_RST);
U8G2_FOR_ADAFRUIT_GFX u8g2; // Set font, support Chinese
// Screen theme, color
int Theme=1;
int backColor = BACK_WHITE; // BACK_BLACK;
uint16_t backFillColor = 0x0000;
int penColor = 0x0000;
// Initialize tft
void tftInit(){
tft.initR(INITR_BLACKTAB); // Initialize ST7735S 128x60
// tft.init(240, 320); // Initialize ST7789 320x240
tft.invertDisplay(false); // Disable invert color function
tft.setSPISpeed(40000000); // Set SPI_DEFAULT_FREQ
tft.setRotation(1); // Rotate display orientation 0,1
// Set theme color
if(Theme == 1){ // Originally a black theme, changed to white.
backColor = WHITE;
backFillColor = 0xFFFF;
penColor = 0x0000;
}else{
backColor = BLACK;
backFillColor = 0x0000;
penColor = 0xFFFF;
}
tft.fillScreen(backColor);// Set the screen background color
u8g2.begin(tft); // Establish a connection between u8g2 and Adafruit_ST77xx, very important, omitting this will cause an error
}
// Refresh the entire screen by background color
void reflashTFT(){
tft.fillScreen(backColor);
}
// Invert the screen color
void invertDisplayTFT(){
tft.invertDisplay(true);
delay(500);
tft.invertDisplay(false);
delay(500);
}
// Display text at a specified position
void drawtext(uint16_t x,uint16_t y,String text, uint16_t color) {
// 1. Use u8g2 for output, supporting Chinese characters
u8g2.setFont(FONT); // The Chinese font u8g2_font_wqy12_t_gb2312 has many fonts (around 210,000) while u8g2_font_wqy14_t_chinese1 has fewer fonts (around 14,000).
`u8g2.setFontMode(0); // Use u8g2's transparent mode (default)`
`u8g2.setFontDirection(0)
;` `u8g2.setForegroundColor(color); // Foreground color`
`u8g2.setBackgroundColor(WHITE); // Background color`
`u8g2.setCursor(x, y); // Text position`
`u8g2.print(text);
` }
// Draw the icon on the screen `
void drawicon()
{`
`u8g2.setFont(u8g2_font_siji_t_6x10); // Icon font`
`u8g2.setFontMode(1); // Use u8g2's transparent mode (default)`
`u8g2.setForegroundColor(BLACK);` Foreground color:
`u8g2.setBackgroundColor(WHITE);` // Background color
: `u8g2.drawGlyph(5, 12, 0x0e1ff);` // Power icon: `
u8g2.drawGlyph(160-16-5, 12, 0x0e21a);` // WiFi icon:
`u8g2.drawGlyph(10, 90, 0x0e015);` // Time icon:
`u8g2.drawGlyph(10, 40, 0x0e0cc);` // Temperature icon:
`u8g2.drawGlyph(10, 55, 0x0e0cf);` // Humidity icon: `
u8g2.drawGlyph(80, 40, 0x0e022);` // Weather icon: `u8g2.drawGlyph(80, 55, 0x0e083);` // Wind icon: `
u8g2.drawGlyph(80, 55, 0x0e083); ` // Draw the title void drawTitle(){ drawtext(35, 11, "ESP32 Desktop Weather Station", BLACK); } // Draw a rectangle void drawRectsBackground(uint16_t x,uint16_t y,uint16_t width,uint16_t height,uint16_t color) { //tft.fillScreen(WHITE); tft.drawRect(x, y,width,height, color); } // Draw a rounded rectangle void drawRoundRectsBackground(uint16_t x,uint16_t y,uint16_t width,uint16_t height,int16_t radius,uint16_t color) { //tft.fillScreen(WHITE); tft.drawRoundRect(x, y,width,height,radius,color); } // Draw a line void drawLine(uint16_t x1, uint16_t y1, uint16_t x2, uint16_t y2, uint16_t color) { tft.drawLine(x1, y1, x2, y2, color); } Important Notes for Physical Display : If you are a beginner like me, when purchasing a screen, be sure to specify "plug-in" in the notes. Do not solder it. Otherwise, you will regret it when you solder a broken screen. Don't ask me how I know; it's all tears.


If you accidentally bought a soldered one, it's best to make an FPC adapter cable. The seller sent me a soldered one, 18 pins, 0.8mm pitch. There weren't any ready-made FPC adapter cables for this pitch, so I had to design one myself. I used JLCPCB's FPC board for PCB fabrication, and after receiving it, I felt it was really good.


 京公网安备 11010802033920号

 K6X1008C2D-F


