Circuit diagram of intercom made with LM386
Source: InternetPublisher:他们逼我做卧底 Keywords: Walkie-talkie half-duplex LM386 Updated: 2025/09/23
The circuit diagram below illustrates the circuit's principle. This circuit only supports half-duplex intercom, meaning only one party can speak while the other listens, not both simultaneously. Speaking and listening are controlled by switch S1, located at the base station. With S1 positioned as shown, the base station listens while the extension speaks. Flipping S1 downward allows the base station to speak while the extension listens. The extensions have only one speaker, BL2, which serves as both a microphone and receiver. The same applies to the base station's speaker, BL1. The LM386 acts as an amplifier, with input signal at pin 3 and output signal at pin 5. Capacitors connected to pins 1 and 8 adjust the circuit's gain and are optional. The power supply voltage can range from 4.5 to 9V.
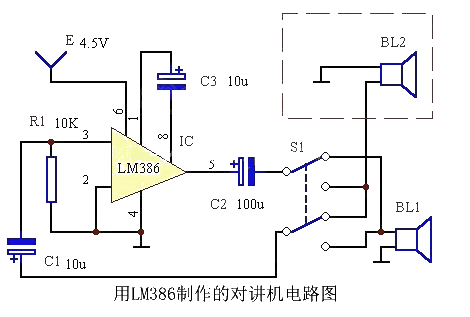
It is best to use a twisted pair cable for the BL2 lead to reduce interference. If necessary, a power switch can be added to avoid wasting energy when not in use. The disadvantage of this circuit is that the extension cannot call the host.
- 76-110MHz band FM radio transmitter
- 1-watt portable PLL transmitter
- Building a simple FM transmitter
- Aircraft radio receiver
- Simple FM radio
- Use one sky controller to control two polar axis antennas
- High-quality banner/FM radio circuit
- 6N1 regenerative three-lamp tube radio
- Principle block diagram and circuit diagram of seven-tube AM radio
- FM transmitter circuit with power up to 300mw made of discrete components
- Practical amplifier circuit a composed of operational amplifier LM386
- Internal circuit principle of LM386
- Walkie-talkie fast charger circuit
- Household voice-activated intercom circuit
- Simple and easy to make LM386 power amplifier circuit
- Duplex intercom using RC network to eliminate side noise
- Multi-channel control wired intercom circuit diagram
- Clever use of LM386 as audio oscillator circuit diagram
- Clever use of LM386 as light control relay circuit diagram
- Clever use of LM386 as a mono-scale generator circuit diagram


 京公网安备 11010802033920号