Coil short circuit tester
Source: InternetPublisher:司马缸砸光 Keywords: Short circuit tester Updated: 2025/08/29
The motor short-circuit tester introduced here can not only accurately detect short-circuit faults exceeding a single turn in motor and generator windings, but can also inspect cast aluminum bars in squirrel-cage rotors for broken bars. It can also be used to test while rewinding motor windings, avoiding the possibility of wasted time due to improper operation and short circuit detection.
1. Introduction to working principle
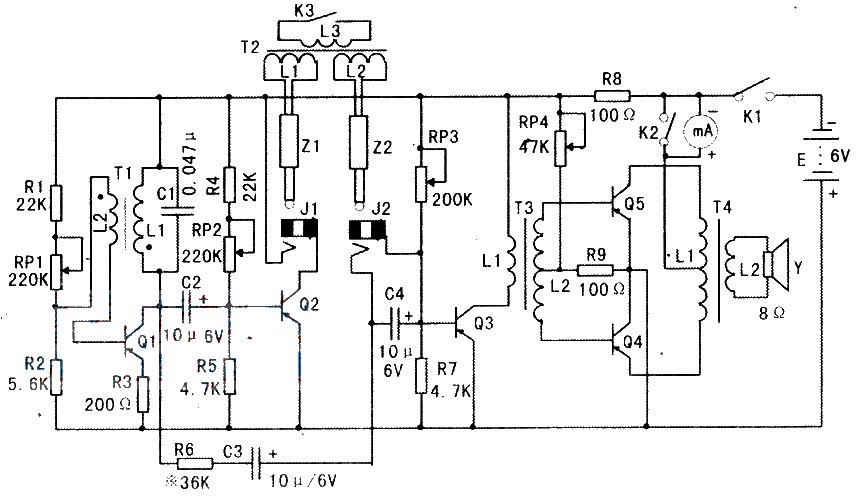
The circuit diagram of this motor short-circuit tester is shown in the attached figure. Its principle is simple. Transistor Q1, transformer T1, and C1 form a transformer feedback oscillator circuit. This generates an approximately 2000 Hz audio signal, which is then coupled to transistor Q2 via C2 for amplification. The amplified audio signal is output from Q2's collector. When plug Z1 is inserted into socket J1, the audio current flows through winding L1 of test transformer T2. When the test transformer core contacts the motor core under test, the transformer's main magnetic path is established through the motor core under test. (Due to the U-shaped core of the test transformer, the transformer's main magnetic path is considered open when the core is not in contact with the motor core under test.) If the coil winding embedded in the motor core's winding slot (when the test transformer core contacts the core with the coil embedded in the motor's winding slot, the motor core and the test transformer core form a single unit, and the coil embedded in the winding slot can be considered another winding, L3, of the test transformer) is not short-circuited (i.e., K3 is open). An audio signal induced voltage is generated across winding L2 and fed through plug Z2 to transistor Q3 for voltage amplification. The amplified signal voltage is then fed through transformer T3 to a push-pull amplifier circuit consisting of transistors Q4 and Q5 for power amplification. Transformer T4 couples the amplified signal voltage to speaker Y for sound production or as indicated by the changing position of the ammeter needle (when switch K2 is open). If the coil winding embedded in the motor core slot under test has experienced an interturn short circuit (equivalent to K3 being closed), the inductance of the test transformer will drop significantly. No audio signal induced voltage will be generated across winding L2, or the generated audio signal induced voltage will be very low. Consequently, the speaker will cease sounding or the volume will be significantly reduced (or, if switch K3 is open, the amplitude of the changing position of the ammeter needle will be significantly reduced). When testing for broken cast aluminum bars in a motor's squirrel-cage rotor, the test transformer core is placed in contact with the motor's rotor core. The motor core forms a single unit with the test transformer core, and the aluminum bars embedded in the rotor core act as winding L3 in the test transformer. If the bars are intact, this is equivalent to a short circuit in L3 (i.e., K3 is closed), and the speaker will stop sounding or significantly reduce its volume. Conversely, if the bars are broken, this is equivalent to an open circuit in L3, resulting in a louder speaker sound (compared to when the bars are intact).
2. Production and debugging instructions
R6 and C3 in the circuit form a positive feedback circuit. Its function is to feed the weak audio signal voltage sensed in winding L2 of the detection transformer back to the base of Q2 for further amplification. Appropriately selecting the value of R6 can adjust the tester's detection sensitivity. RP1 in the diagram is a variable resistor for adjusting the oscillator's operating current. After the circuit is completed, contact the detection transformer core with another transformer core to connect the main magnetic circuit. Then adjust RP1 to start the oscillator (Q1's normal operating current is 0.4-0.6 mA). If the components are functioning properly, installed correctly, and the transistor's operating point is set appropriately, an audible beep should be heard from the speaker. Changing the capacitance of C1 or the number of turns in the primary winding L1 of the oscillation transformer T1 can change the oscillation frequency (i.e., the pitch of the speaker's sound). RP2 in the diagram is a variable resistor for adjusting the operating current of amplifier tube Q2. Changing its value adjusts the tester's detection sensitivity. After the circuit is completed, adjust RP2. When the test transformer core contacts the core of the coil embedded in the motor's wiring slot (the coil can be artificially short-circuited), the speaker will stop or significantly reduce its volume. RP3 in the figure is the variable resistor that adjusts the operating current of the driver Q3. Adjust its resistance to keep the collector current of Q3 between 2mA and 3mA (this also adjusts the tester's sensitivity). RP4 in the figure is the variable resistor that adjusts the quiescent current of the power amplifier stage. Adjust its resistance to keep the quiescent current between 2mA and 4mA (this can be monitored by connecting a milliammeter in parallel across K2 when K2 is disconnected). After confirming that the operating current of each stage of the tester is normal, RP1-RP4 can be replaced with fixed resistors to prevent deterioration of the variable resistors over time and affecting the tester's operation. The oscillation transformer T1 can be constructed using a 10K medium-duty "I"-shaped core as its bobbin. L1 is wound with 60 turns of φ=0.07mm high-strength enameled wire, and L2 is wound with 6 turns of φ=0.07mm high-strength enameled wire. Note that the winding directions of the two windings are opposite. The test transformer T2 uses a 100VA transformer with a "U"-shaped core (if used for testing small motors, the core of T2 can be customized based on the actual situation). The core cross-section is 2 x 3 cm². L1 is wound with 100 turns of φ=0.21mm high-strength enameled wire, and L2 is wound with 200 turns of φ=0.21mm high-strength enameled wire. The boost transformer T3 can be a small input transformer used in transistor radios produced in the 1980s, with a primary-to-secondary turns ratio of 2:1. If homemade, an "E"-shaped core with a cross-section of 5 x 5 mm² can be used. The primary L1 is wound with 100 turns of φ=0.1mm high-strength enameled wire, and the secondary L2 is wound with 50 turns of φ=0.07mm high-strength enameled wire. The tap at the 25th turn is connected to R9. The output transformer T4 is also a small output transformer used in transistor radios produced in the 1980s, with a primary-to-secondary turns ratio of 8:1. If you want to make your own, use the same core as the input transformer mentioned above. Wind the primary, L1, with 200 turns of φ=0.1mm high-strength enameled wire, tapping K3 at the 100th turn. Wind the secondary, L2, with 25 turns of φ=0.1mm high-strength enameled wire. The speaker can be a permanent magnet speaker with φ=65mn/0.25W/8Ω. Transistors Q1-Q5 are all germanium transistors used in transistor radios produced in the 1980s. Q1 is a 3AG11 with a β>100 requirement. Q2-Q5 are 3Ax31A/B with a β>50 requirement. If these transistors are unavailable, common silicon transistors can be used. Q1 uses S9015 with a β>100 requirement. Q2 and Q3 use S9012 with a β>80 requirement. Q4 and Q5 use S8550 with a β>50 requirement. The remaining components are labeled in the attached figure. Switches K1 and K2 are both small toggle switches, and the plugs and sockets are 2.5mm φ plugs and sockets, commonly used in small earphones. The ammeter can be a 91L16-type small square plastic-case ammeter with a range of 100mA. This can be omitted if the ammeter display is not required. Since the tester is not used frequently, to reduce its size, it is powered by four #5 alkaline batteries. The entire tester circuit components can be mounted on an 85x40mm² printed circuit board. The circuit board is then housed in a 90x45x30mm³ plastic case. Sockets J1 and J2, switches K1 and K2, and speaker Y are all mounted on the top cover. Several evenly spaced small holes should be drilled in the top cover at the speaker location using a 2.5mm φ drill bit. The area of the holes should be approximately the same as the speaker cone. The tester is connected to the main circuit board via plugs Z1 and Z2 and sockets J1 and J2. Plugs Z1 and Z2 should preferably use a metal-shielded two-core flexible cable with a length of at least 1.5 meters. When using, insert plugs Z1 and Z2 into sockets J1 and J2, turn the power switch to the "on" position, and then you can start testing. After the test is completed, unplug the heads Z1 and Z2 and turn the power switch to the "off" position.
- AD8307 USB 0-500MHz RF Power Meter
- Zener diode tester 1V to 50V
- Current sensor
- Precision audio millivoltmeter
- Digital AC voltmeter
- Method for measuring leakage current through insulation resistance
- Extending Current Measurement Range with Resistor-Free Sensing Solutions
- How to Accurately Measure Current and Voltage in GSM Systems
- Understand the use and basic principles of DC double-arm bridge in one article
- Simple Field Strength Meter Production
- Machine tool maintenance bearing fault detection circuit
- Pyrothermal infrared detection circuit composed of OPA111
- Three-phase AC power supply phase sequence detection circuit
- Computer power detection circuit
- Level detection circuit using digital-to-analog converter
- Detect the major point waveforms of the circuit
- RMS sensor detection circuit
- Human body detection circuit within mechanical action range
- Direct heating gas-sensitive bridge detection circuit
- Gas concentration detection circuit


 京公网安备 11010802033920号