* 1. Project Function Introduction:
A mobile app allows users to check temperature and humidity anytime, anywhere. Settings can be customized for specific rooms or devices.
Voice input from Xiao Ai and Tmall Genie is supported, eliminating the need for close inspection; the voice assistant can provide the current temperature and humidity.
The MCU used is ESP32C3, and the sensor is Sensirion's SHT40.
* 2. Project Attributes:
This is the first public release of this project.
* 3. Open Source License:
GPL 3.0
* 4. Hardware Components:
I. Main Control Unit

: To minimize costs, a single-module approach was adopted instead of a microcontroller + module approach.
For PCB design flexibility and cost considerations, a bare chip was chosen, allowing for flexible layout.
Therefore, the above components constitute the minimum system of the ESP32C3.
The most difficult part, the antenna, can be handled by shorting L4 with a 0-ohm resistor. C33 and C34 do not need to be soldered
. The sensor part is

a very simple IIC circuit. Two packages are shown here; soldering one is sufficient.
When designing this circuit, 1. considering space constraints and potential interference during subsequent assembly, a bare die package was added.
2. considering the small chip size and the difficulty of manual soldering, a package with a board was also added.
This way, at least for this module, the problems are solved, avoiding the need for additional board fabrication and wasting time and materials.
The screen driver part

is simple; it ensures the screen functions normally. See the attachment for details. The
charging and discharging part:


Figure 1 shows the 4056 charging circuit with an added NTC resistor. If battery temperature detection is not required, R24 is disconnected, and R23 is shorted for normal charging. The
charging current is controlled by R22. Due to the small battery capacity and the significant heat generated by a large charging current, which could affect the sensor, the charging current is around 250mA-300mA.
Figure 2 shows that to prevent damage to the device from simultaneous charging and discharging, an external charger is used during charging.
V. The step-down circuit

uses a DC-DC converter because it has high conversion efficiency, low power consumption, and small voltage drop, making it suitable for battery-powered devices.
To further reduce power consumption, the voltage can be lowered. Testing showed that the ESP32C3 cannot operate below 3V (consistent with the manual).
Therefore, the voltage is set to Vo = 0.6 * (1 + 20 / 4.7) = 3.15V.
VI. Powering off the module is necessary


because the screen does not need to be constantly refreshed, and the battery voltage does not need to be constantly sampled. The power is only turned on when the screen needs to be refreshed or the battery voltage needs to be sampled, thus saving energy.
The on-resistance of the MOSFET is very small and has virtually no impact on downstream devices.
A transistor pulls down a resistor, which can release the I/O when the power supply to the subsequent stage is not needed, and can automatically maintain the off state.
VII. Wake-up Switch

: A mercury switch is used here. When the device is tilted backward, it wakes up and updates temperature and humidity data in real time.
Some angle sensors (such as the commonly used MPU6050) can also be used, but there are many limitations: 1. They are relatively expensive; 2. I/O is limited.
It is particularly important to note that mercury vapor is toxic, so please do not drop it.
Vibration switches or other switches can also be used.
VIII. Other Circuit Notes:
In the debugging circuit section, a USB debugging circuit was originally provided, but due to insufficient I/O, its I/O was used instead (the four resistors near the Type-C port are not soldered), so the Type-C and USB ports are only for charging.
PCB Related Specifications:
Overall size 5x5 cm.
To minimize the impact of heat generation during charging on sensor readings, the longest possible isolation is used

, and grooves are cut around the sensor to reduce the impact of heat from other components on data accuracy.

The top silkscreen layer adds lines around both the charging module and the sensor. This is the part on the casing where a stretching area should be added for isolation; no components are placed in this area, allowing the casing to fit snugly against the PCB, further isolating the device's internal components from the sensor.
*5. Software Section:
Software compilation using VS Code based on ESP-IDF. Reference links (Software Section. Pinned):
1. LCSC Desktop Thermometer and Hygrometer Project Documentation (6-Temperature and Humidity Acquisition (yuque.com)
https://www.yuque.com/wldz/jlceda/ycxrhmcyxkvomgm1
2. Diandeng Technology Official Website (Diandeng Technology (diandeng.tech)
https://diandeng.tech/doc/freertos-support
3. Espressif ESP-IDF Programming Guide
Quick Start - ESP32-C3 - — ESP-IDF Programming Guide v5.3 Documentation (espressif.com)
4. ESPIDF Integration with Blinker:
ESP32 IDF + Blinker Learning Notes 2 - ESP32 Adaptation to Blinker_esp_idf Steps_esp32 blinker - CSDN Blog
5. Custom Partition List When the Font Library is Too Large to Store: ESP32 Custom Partition Table_app partition is too small for binary - CSDN Blog
https://blog.csdn.net/qq_44662794/article/details/125248484
etc.
2. Approximate Process:

Partial Source Code
Main Function

Xiao Ai Callback


Temperature and Humidity Sensor IIC Part
IIC

Temperature Acquisition


Voltage Acquisition, Lookup Table Method for Power Acquisition

Screen Part Interface
Initialization

Screen Initialization

Program Burning
uses Espressif's official burning software, which is attached.
Burning Settings:
First step, open the burning software, select ESP32C3, select UART

. Second step, set up the burning according to this diagram.

Last step, restart the module, and you can proceed with network configuration.
After restarting, while waiting for network configuration, the board's running light will illuminate; after network configuration is complete, it will turn off.
For network configuration, either the official BLINKE software or the official Espressif software can be used.
Use SmartConfig V2 and enter your Authkey into the additional data.
If you change your Wi-Fi or Blinker account and need to reconfigure, press "rest" 5 times consecutively within 5 seconds to restore the initial settings and begin reconfiguring the network and identification code.
Note: Press the button approximately once per second, don't press too quickly. After pressing once, wait for the running indicator light to illuminate, then press it again, repeating this process 5 times. Once the running light is constantly on, open the mobile app to begin configuration.
To connect to Xiao Ai (Xiaomi's AI assistant) and Tmall Genie, you can bind your Blinker account in Mi Home and Tmall Genie for voice interaction.
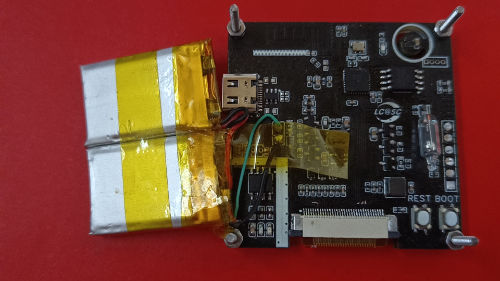
The mobile app can be used to view temperature and humidity. The remaining PCB

components
are currently in use and are stacked together. A 3D shell design is also included; these will be shipped with the next sample.
Overall preview ( front

and back, inside and front) , *6; BOM list (see BOM table for details) , *7; Competition logo verification, *8; Demo your project and record a video for upload. Video requirements: Please shoot in landscape mode, resolution no less than 1280×720, format Mp4/Mov, single video size limited to 100M; Video title: LCSC Electronics Competition: {Project Name}-{Video Module Name}; e.g., LCSC Electronics Competition: "Autonomous Driving" - Team Introduction. Go to view more details >


 京公网安备 11010802033920号

 MPLS48DS-GK-BLM


