Fanless silent power supply
Source: InternetPublisher:52WhqEs Keywords: Computer power supply Updated: 2026/02/27
There are several different ways to do this, but basically you need to make the heatsink uncharged and provide better cooling for the transistors.
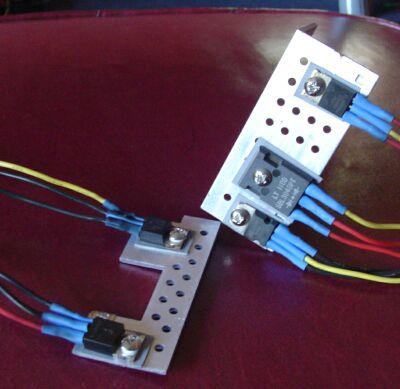
The heatsinks used in power supplies are typically soldered to the PCB via small metal plates. Current usually flows through them, meaning they carry voltage and are part of the circuit. What you need to do is cut these plates, remove the heatsinks from the circuit, and then replace their parts in the circuit with wires.

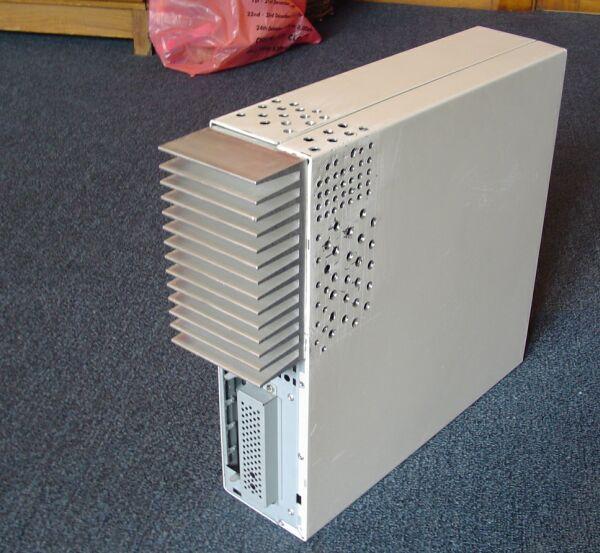
The second part can be accomplished in several ways, such as making heat sinks to replace the existing ones and mounting them onto a larger heat sink (which is what I do below), or extending the transistors with wires and mounting them directly onto a large heat sink.
I tried this method on three different power supplies, but none of them worked. After adding the wires, the power supply would make a humming or hissing sound. I tried keeping the wires very short and repeatedly checked all the connections. I asked a power supply repairman why, and he said it was the extra resistance the wires created in the circuit that caused the noise. He also said that this might seem like a very small difference, but because they are operating at very high frequencies. I wanted a truly silent power supply, so I was particularly concerned about the noise it produced, so if you do the same thing, you might not notice or care. Maybe I was just unlucky and chose the wrong power supply, I don't know, but anyway, it worked like this:
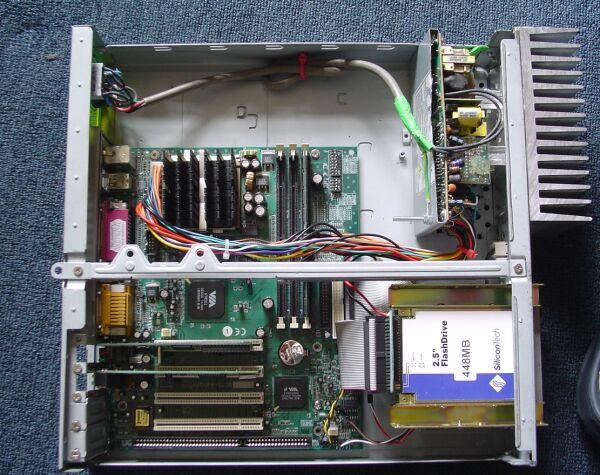
I was lucky enough to get a 150-watt Micro ATX power supply with a grounded heatsink.
There are several different ways to do this, but basically you need to make the heatsink uncharged and provide better cooling for the transistors.
The heatsinks used in power supplies are typically soldered to the PCB via small metal plates. Current usually flows through them, meaning they carry voltage and are part of the circuit. What you need to do is cut these plates, remove the heatsinks from the circuit, and then replace their parts in the circuit with wires.
When finished, it might look like this (where the wires are on the metal plate):
The second part can be accomplished in several ways, such as making heat sinks to replace the existing ones and mounting them onto a larger heat sink (which is what I do below), or extending the transistors with wires and mounting them directly onto a large heat sink.
I tried this method on three different power supplies, but none of them worked. After adding the wires, the power supply would make a humming or hissing sound. I tried keeping the wires very short and repeatedly checked all the connections. I asked a power supply repairman why, and he said it was the extra resistance the wires created in the circuit that caused the noise. He also said that this might seem like a very small difference, but because they are operating at very high frequencies. I wanted a truly silent power supply, so I was particularly concerned about the noise it produced, so if you do the same thing, you might not notice or care. Maybe I was just unlucky and chose the wrong power supply, I don't know, but anyway, it worked like this:
I was lucky enough to get a 150-watt Micro ATX power supply with a grounded heatsink:
I had to remove a capacitor to unscrew the transistor from the heatsink:
Another problem I had to solve was completely removing the transistor and everything else because I couldn't reach in with a screwdriver to remove the screws from the transistor.
I had to remove a capacitor to unscrew the transistor from the heatsink.
Then I made a similar heatsink using regular 5mm aluminum. I did this because the original heatsink was difficult to bolt onto the larger heatsink.


- 12V to 28V DC-DC converter (based on LM2585)
- 0-30V Mini Desktop Power Supply
- Vehicle-mounted 12V to 50V DC converter
- Classic positive and negative DC power supply
- Lithium polymer battery charging solution using MCP73833
- Fluorescent lamp inverter
- 10A 1-30V Adjustable Power Supply Based on LM317
- Tips on how to optimize voltage monitors
- Mitigating Overheating in Hyperscale and Ultra-Scale FPGA Applications
- Series and parallel connection of ideal voltage sources
- STR5412 power circuit
- Power circuit b composed of intelligent thyristor modules
- Portable device charging power circuit design
- EPSON PHOTO 830U printer power circuit
- Power supply circuit with multiple outputs (MAX1902)
- 500A-6V single-phase thyristor voltage regulating electroplating power supply circuit
- Timing switch AC power circuit
- Recording level power supply circuit
- Class A power amplifier power circuit
- Common power circuits and applications 01


 京公网安备 11010802033920号