This circuit shows how to use the precision analog microcontroller ADuCM360 / ADuCM361 in a precision thermocouple temperature monitoring application . ADuCM360/ADuCM361 integrates dual-channel 24-bit analog-to-digital converter (ADC), dual-channel programmable current source, 12-bit analog-to-analog converter (DAC), 1.2 V internal reference voltage source, ARM Cortex-M3 core, 126 kB Flash memory, 8 kB SRAM, and various digital peripherals such as UART, timers, SPI and I 2 C interfaces, etc.
In this circuit, the ADuCM360/ADuCM361 are connected to a thermocouple and a 100 Ω platinum resistance temperature detector (RTD). RTD is used to perform cold junction compensation.
In the source code, the ADC sampling rate is selected as 4 Hz. The noise-free code resolution of the ADuCM360/ADuCM361 is greater than 18 bits when the ADC input programmable gain amplifier (PGA) is configured with a gain of 32.


The following features of the ADuCM360/ADuCM361 are used in this application:
Thermocouples and RTDs produce very small signals, so a PGA is required to amplify these signals.
The thermocouple used in this application is type T (copper-constantan), which has a temperature range of −200°C to +350°C. The sensitivity is approximately 40V/°C, which means the ADC can cover the entire temperature range of the thermocouple in bipolar mode and 32x PGA gain setting.
RTD is used to perform cold junction compensation. This circuit uses a platinum 100Ω RTD, model number Enercorp PCS 1.1503.1. It comes in a 0805 surface mount package. The temperature change rate is 0.385Ω/°C.
Note that the reference resistor RREF should be a precision 5.6kΩ (±0.1%) resistor.
The USB interface of ADuCM360/ADuCM361 is implemented through the FT232R UART to USB transceiver, which directly converts USB signals to UART.
In addition to the decoupling shown in Figure 1, the USB cable itself must use ferrite beads to enhance EMI/RFI protection. The ferrite beads used in this circuit are Taiyo Yuden #BK2125HS102-T, which has an impedance of 1000Ω at 100 MHz.
This circuit must be built on a multilayer printed circuit board (PCB) with a large ground plane. For optimal performance, proper layout, grounding, and decoupling techniques should be used (refer to Tutorial MT-031 - Implementing Data Converter Grounding and Solving the Mysteries of "AGND" and "DGND" , Tutorial MT-101 - —Decoupling techniques , and ADuCM360TCZ evaluation board layout).
The PCB used to evaluate this circuit is shown in Figure 2.


Code description
The source code link used to test the circuit is in the CN0221 Design Support package: http://www.analog.com/CN0221-DesignSupport
The UART is configured for baud rate 9600, 8 data bits, no polarity, and no flow control. If this circuit is directly connected to the PC, you can use a communication port viewing program such as "HyperTerminal" to view the results sent by the program to the UART, as shown in Figure 3.


Measure the temperature of the thermocouple and RTD to obtain a temperature reading. Convert the RTD temperature to its equivalent thermocouple voltage using a lookup table (see ISE's ITS-90 Type T Thermocouple Table). These two voltages are added to give the absolute temperature value of the thermocouple.
First, V1 is the voltage measured between the two wires of the thermocouple. Using a lookup table, the RTD voltage is measured and converted to a temperature value; this temperature value is then converted to its equivalent thermocouple voltage (V2). V1 and V2 are then added to give the total thermocouple voltage value, which is converted into the final temperature measurement.


Initially, this conversion was based on a simple linear assumption: the thermocouple temperature was 40V/°C. As can be seen from Figure 4, the error caused by such a conversion is only acceptable for a small range of temperatures around 0°C. A better way to calculate the thermocouple temperature is to use a 6th order polynomial for positive temperatures and a 7th order polynomial for negative temperatures. This requires mathematical operations, resulting in increased computation time and codeword size. A suitable compromise is to calculate the corresponding temperatures for a fixed number of voltages and then store these temperatures in an array with values in between using linear interpolation of adjacent points. As can be seen from Figure 5, the error is significantly reduced when using this method. Figure 5 shows the error of the algorithm using ideal thermocouple voltages.


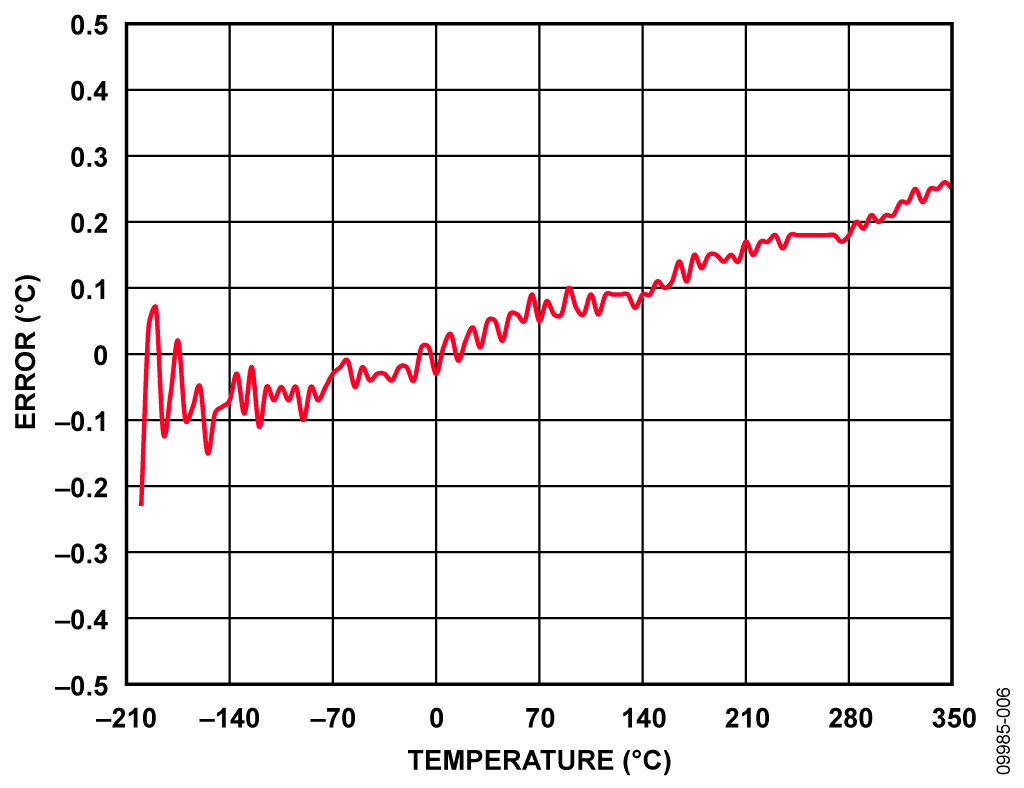
Figure 6 shows the error caused by using ADC1 on the ADuCM360 to measure 52 thermocouple voltages within the full thermocouple operating range. The overall maximum error is <1°C.

Like thermocouples, RTD temperatures can be calculated and implemented using lookup table methods. Note that the polynomial that describes the relationship between RTD temperature and resistance is different from the polynomial that describes the relationship between thermocouples.
For more information on linearization and achieving optimal RTD performance, please refer to application note AN-0970: RTD Interface and Linearization with ADuC706x Microcontrollers .


Blockdiagram
All reference designs on this site are sourced from major semiconductor manufacturers or collected online for learning and research. The copyright belongs to the semiconductor manufacturer or the original author. If you believe that the reference design of this site infringes upon your relevant rights and interests, please send us a rights notice. As a neutral platform service provider, we will take measures to delete the relevant content in accordance with relevant laws after receiving the relevant notice from the rights holder. Please send relevant notifications to email: bbs_service@eeworld.com.cn.
It is your responsibility to test the circuit yourself and determine its suitability for you. EEWorld will not be liable for direct, indirect, special, incidental, consequential or punitive damages arising from any cause or anything connected to any reference design used.
Supported by EEWorld Datasheet
EEWorld
subscription
account

EEWorld
service
account

Automotive
development
community

Robot
development
community

About Us Customer Service Contact Information Datasheet Sitemap LatestNews


Room 1530, 15th Floor, Building B,
No.18 Zhongguancun Street,
Haidian District,
Beijing, Postal Code: 100190
China
Telephone: 008610 8235 0740
 京公网安备 11010802033920号

 M55342H04B12A6CT1


