How to use PWlink to download the program? First open Keil, then open the magic wand, and in Debug, we select the third "DAP", and then click "ok". Why not use the serial port to burn? According to many group friends, the serial port download of N32 is extremely unstable! In order to save time and facilitate debugging. Using various links to download and debug programs is the best choice.
 The advanced version of the voltage conversion chooses the dcdc buck solution. Since the official dcdc buck chip: BL9342, in the topology of the schematic diagram provided by the official scheme, the starting voltage of BL9342 is 6v, but 5v can start this chip when fast charging is triggered. So in order to start DCDC without fast charging, RT8259 is used here for voltage conversion. In its typical application circuit, the voltage input range is 4.5v-24v, but RT8259 heats up seriously in high voltage conditions.
 Because I bought a 90kΩ resistor in LiChuang Mall, I mistakenly bought a 390kΩ resistor. Adjust VOLTAGE_FACTOR to 4 in the program to solve the problem.
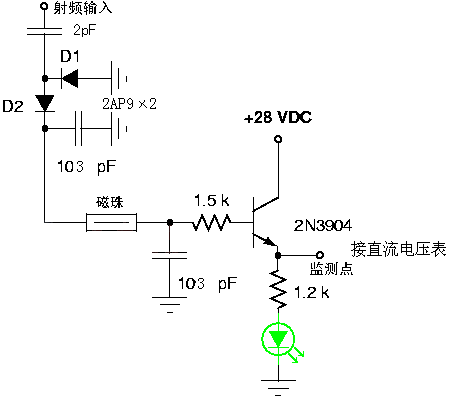
 The sampling method uses low-side sampling, that is, the sampling resistor is connected to the GND loop. This design can calculate the complete differential, follow, amplify, and output when the differential signal is sent to the op amp. If high-side sampling is used, that is, the sampling resistor is placed at a high position between the power supply and the load, although this placement not only eliminates the ground interference generated in the low-side detection scheme, but also detects the accidental short circuit from the battery to the system ground, but high-side detection requires the detection amplifier to handle a common-mode voltage close to the power supply voltage. This common-mode voltage value range is very wide, ranging from the level required to monitor the processor core voltage (about 1V) to hundreds of volts commonly used in industrial, automotive, and telecommunications applications. Application examples include typical laptop battery voltage (17 to 20V), 12V, 24V or 48V batteries in automotive applications, 48V telecommunications applications, high-voltage motor control applications, current detection for avalanche diodes and PIN diodes, and high-voltage LED backlights. Therefore, an important advantage of high-side current detection is that the detection amplifier has the ability to handle large common-mode voltages. Therefore, the current sampling method of sampling resistor plus op amp is best performed at the low end. Although low-end sampling will affect the ripple of the signal due to common ground interference. But compared to the high end, the solution is simple, easy to implement, low cost, and high reliability. (Copied from the official website)
  Advanced version of the sampling circuit:
 According to the data sheet, the waveform output by the encoder when it rotates is similar to that of the Hall encoder, so the interrupt comparison level is used in the software to determine whether it is forward or reverse. After actual testing, the output result of the encoder is relatively stable when the interrupt mode is selected as the rising and falling edge trigger.
  Use CH224K for PD deception. CH224K has integrated USB PD and other fast charging protocols, supports PD3.0/2.0, BC1.2 and other boost fast charging protocols, automatically detects VCONN and simulates E-Mark chips, supports up to 100W power, built-in PD communication module, high integration, and streamlined peripherals. Integrated output voltage detection function, and provides over-temperature and over-voltage protection functions. It can be widely used in various electronic devices to expand high-power input such as wireless chargers, electric toothbrushes, rechargeable shavers, lithium battery power tools and other applications. CH224K generates a lot of heat under high voltage conditions, and the layout is designed for heat dissipation.
  follows. The hardware circuit of CH224K is as follows:
 Display effect:
  The advanced version uses Zhongjingyuan 0.96-inch color LCD (plug-in version) without external circuit, and uses FPC0.5 8p connector to connect the screen to the PCB.
  Display effect:


All reference designs on this site are sourced from major semiconductor manufacturers or collected online for learning and research. The copyright belongs to the semiconductor manufacturer or the original author. If you believe that the reference design of this site infringes upon your relevant rights and interests, please send us a rights notice. As a neutral platform service provider, we will take measures to delete the relevant content in accordance with relevant laws after receiving the relevant notice from the rights holder. Please send relevant notifications to email: bbs_service@eeworld.com.cn.
It is your responsibility to test the circuit yourself and determine its suitability for you. EEWorld will not be liable for direct, indirect, special, incidental, consequential or punitive damages arising from any cause or anything connected to any reference design used.
Supported by EEWorld Datasheet
EEWorld
subscription
account

EEWorld
service
account

Automotive
development
community

Robot
development
community

About Us Customer Service Contact Information Datasheet Sitemap LatestNews


Room 1530, 15th Floor, Building B,
No.18 Zhongguancun Street,
Haidian District,
Beijing, Postal Code: 100190
China
Telephone: 008610 8235 0740
 京公网安备 11010802033920号

 1200HGH3009F2LB