It is based on the original work of Digital Home fan @DaodaoShaZhu.
1. Burning method:
1. Select "STC8H1K17" as the chip model.
2. The programming interface is located on the bottom right corner of the back of the PCB.
3. Please set the operating frequency to "33.1776MHz".
4. When updating the firmware, it is recommended to record the calibration value first.
2. Calibrate with reference to the calibration process. The error between the set current value and the actual current value will be smaller. The process is also posted here. Make.
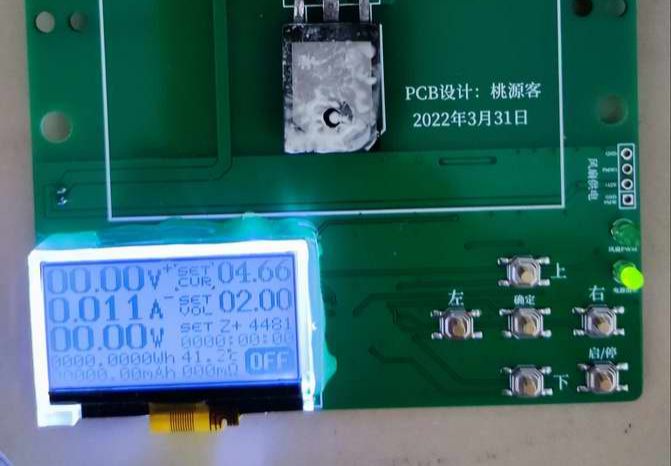
After all, P100C has a black and white screen with little display content, so English letters are used to mark the following parameters:
Output zero point: Z+ (Output zero point means that the actual current should also be 0A when the set current is 0A)
Voltage coefficient: Vx (voltage coefficient is used for calibration Actual display voltage)
Current coefficient: Ax (current coefficient is used to calibrate the actual display current)
Proportional coefficient: ax (Proportional coefficient is used to calibrate the ratio of the set current to the actual display current)
Voltage zero point: V- (Voltage zero point is used to calibrate the actual display Voltage zero point)
Current zero point: A- (Current zero point is used to calibrate the actual displayed current zero point)
You can calibrate according to the following process after turning on the computer for the first time or restoring factory settings. You need to prepare a high-precision constant voltage and constant current adjustable power supply as a benchmark (multimeter It works but it’s more troublesome), otherwise the calibration is meaningless.
1. Do not connect any load after turning on the computer. If the voltage and current display has a base value, adjust the voltage zero point (V-) and current zero point (A-) on the electronic load calibration page to return them to zero, that is, adjust to the ± in the upper right corner of the voltage and current value. The positive and negative polarity indicates the critical point when it changes repeatedly (because the ADC supports measuring negative voltage and current).
2. Connect the constant voltage and constant current adjustable power supply as the load, set the constant voltage of the adjustable power supply to 10.00V (it can also be other voltage values), and adjust the voltage coefficient on the electronic load calibration page to make it equal to the voltage value displayed on the adjustable power supply. Consistently 10.00V (an error of ±0.5% is normal).
3. Set the electronic load discharge current to 0A, then start the operation, and adjust the output zero point (Z+) on the calibration page so that the real-time current is the critical point of 0~0.001A.
4. Set the constant current of the adjustable power supply to be greater than 5A (it can also be other current values), set the electronic load discharge current to 5A or less than the constant current value of the adjustable power supply (it can also be other current values), and adjust the electronic load calibration during operation. The proportional coefficient (ax) of the page makes the set current displayed on the electronic load screen and the current value displayed on the adjustable power supply the same as 5A. Then adjust the current coefficient (Ax) of the electronic load so that the real-time current value is displayed on the electronic load screen. The calibration can be completed at 5A (it is normal for there to be an error between the set current and the actual current).


 京公网安备 11010802033920号

 Q120.0-MQ1-30-30/100-T3-7OT-PT-LF


